转载自: https://www.cnblogs.com/sanzao/p/10528677.html
本文主要结合 java.lang.Thread 源码,梳理 Java 线程的整体脉络;
一、线程概述
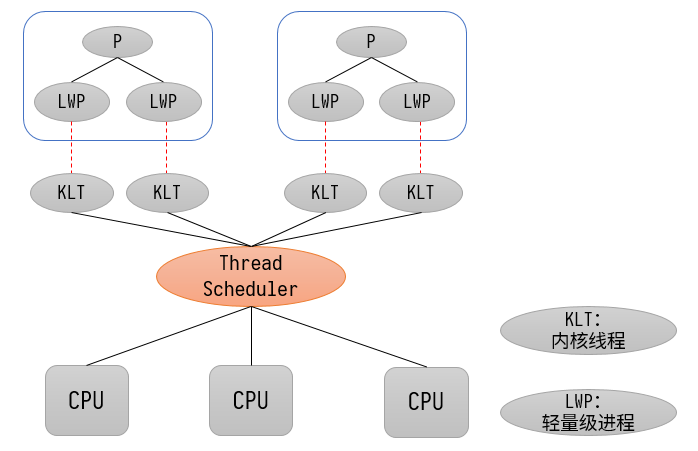
对于 Java 中的线程主要是依赖于系统的 API 实现的,这一点可以从 java.lang.Thread;源码中关键的方法都是 native 方法看出,也可以直接查看 OpenJDK 源码看出来,这一点后面还会讲到;对于 JDK1.8 而言,他的 Windows 版和 Linux 版使用的都是 1:1 线程模型 ,即系统内核线程和轻量级进程的比是 1:1;
内核线程(Kernel-Level Thread,KLT):是由操作系统内核(Kernel)直接支持的线程,这种线程由内核来完成切换,内核通过调度器(Schedule)进行调度,并负责将线程的任务映射到各个处理器上;
轻量级进程(Light Weight Process,LWP):程序可以直接使用的一种内核线程高级接口,也就是我们通常意义上的线程;
如图所示:
优点:
由内核线程的支持,每个线程都成为一个独立的调度单元,即线程之间不会相互阻塞影响;使用内核提供的线程调度功能及处理器映射,可以完成线程的切换,并将线程的任务映射到其他处理器上,充分利用多核处理器的优势,实现真正的并行。
缺点:
同时由于基于内核线程实现,线程的创建、关闭、同步等操作都需要系统调用;需要在用户态和内核态之间切换,代价相对较高;
另外每个线程都需要消耗一定的内核资源,如内核线程的栈空间,所以系统支持的轻量级进程是有限的;
二、线程状态
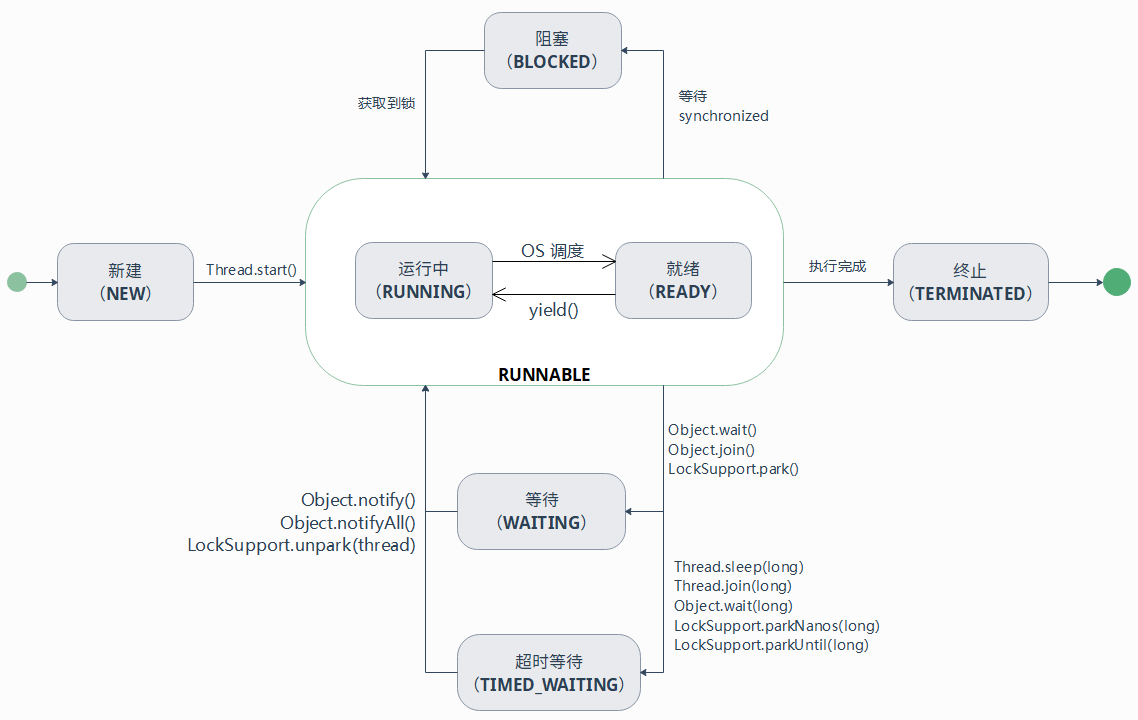
Java 线程的整个生命周期可能会经历以下5中状态,如图所示:
新建(New):新建后未启动的线程;
运行(Runnable):包括运行中(Running)和就绪(Ready)两种状态;也就是正在运行,或者等待 CPU 分配执行时间;
等待(Waiting):无限期的等待其他线程显示唤醒;
超时等待(Timed_Waiting):一定时间内没有被其他线程唤醒,则由系统自动唤醒;
阻塞(Blocked):等待获取排它锁;
终止(Terminated):运行终止;
三、源码分析
1. native注册
1 2 3 4 5 private static native void registerNatives () ;static { registerNatives(); }
这段代码在很多地方都出现过,比如:
1
2
3
java.lang.System java.lang.Object java.lang.Class
其作用就是在使用 JNI 时需要向 JVM 注册,其方法名默认为 Java_<fully qualified class name>_method;但是如果觉得这样的名字太长,这是就可以使用 registerNatives() 向 JVM 注册任意的函数名;
Thread 中的 native 方法有:
1
2
3
4
5
6
7
8
9
10
11
12
13
14
15
16
private native void start0 () ;private native void stop0 (Object o) ;public final native boolean isAlive () ;private native void suspend0 () ;private native void resume0 () ;private native void setPriority0 (int newPriority) ;public static native void yield () ;public static native void sleep (long millis) throws InterruptedException;public static native Thread currentThread () ;public native int countStackFrames () ;private native void interrupt0 () ;private native boolean isInterrupted (boolean ClearInterrupted) ;public static native boolean holdsLock (Object obj) ;private native static Thread[] getThreads();private native static StackTraceElement[][] dumpThreads(Thread[] threads);private native void setNativeName (String name) ;
其对应 JVM 源码
1 2 3 4 5 6 7 8 9 10 11 12 13 14 15 16 17 18 19 static JNINativeMethod methods[] = { {"start0" , "()V" , (void *)&JVM_StartThread}, {"stop0" , "(" OBJ ")V" , (void *)&JVM_StopThread}, {"isAlive" , "()Z" , (void *)&JVM_IsThreadAlive}, {"suspend0" , "()V" , (void *)&JVM_SuspendThread}, {"resume0" , "()V" , (void *)&JVM_ResumeThread}, {"setPriority0" , "(I)V" , (void *)&JVM_SetThreadPriority}, {"yield" , "()V" , (void *)&JVM_Yield}, {"sleep" , "(J)V" , (void *)&JVM_Sleep}, {"currentThread" , "()" THD, (void *)&JVM_CurrentThread}, {"countStackFrames" , "()I" , (void *)&JVM_CountStackFrames}, {"interrupt0" , "()V" , (void *)&JVM_Interrupt}, {"isInterrupted" , "(Z)Z" , (void *)&JVM_IsInterrupted}, {"holdsLock" , "(" OBJ ")Z" , (void *)&JVM_HoldsLock}, {"getThreads" , "()[" THD, (void *)&JVM_GetAllThreads}, {"dumpThreads" , "([" THD ")[[" STE, (void *)&JVM_DumpThreads}, {"setNativeName" , "(" STR ")V" , (void *)&JVM_SetNativeThreadName}, };
其具体实现可以查看
1
2
openjdk\hotspot\src\share\vm\prims\jvm.h openjdk\hotspot\src\share\vm\prims\jvm.cpp
2. 构造方法和成员变量
1
2
3
4
5
6
7
8
9
10
11
12
13
14
15
16
17
18
19
20
21
22
23
24
25
26
27
28
29
30
31
32
33
34
35
36
37
38
39
40
41
42
43
44
45
46
47
48
49
50
51
52
53
54
55
56
57
58
59
60
61
62
63
64
65
66
67
68
69
70
71
72
73
74
75
76
77
78
79
80
81
82
83
84
85
86
87
88
89
90
91
public class Thread implements Runnable { private volatile String name; private int priority; private boolean daemon = false ; private Runnable target; private ThreadGroup group; ThreadLocal.ThreadLocalMap threadLocals = null ; ThreadLocal.ThreadLocalMap inheritableThreadLocals = null ; private long tid; ... public Thread () { init(null , null , "Thread-" + nextThreadNum(), 0 ); } public Thread (Runnable target) { init(null , target, "Thread-" + nextThreadNum(), 0 ); } public Thread (ThreadGroup group, Runnable target) { init(group, target, "Thread-" + nextThreadNum(), 0 ); } public Thread (String name) { init(null , null , name, 0 ); } public Thread (ThreadGroup group, String name) { init(group, null , name, 0 ); } public Thread (Runnable target, String name) { init(null , target, name, 0 ); } public Thread (ThreadGroup group, Runnable target, String name) { init(group, target, name, 0 ); } public Thread (ThreadGroup group, Runnable target, String name, long stackSize) { init(group, target, name, stackSize); } private void init (ThreadGroup g, Runnable target, String name, long stackSize, AccessControlContext acc, boolean inheritThreadLocals) { if (name == null ) { throw new NullPointerException ("name cannot be null" ); } this .name = name; Thread parent = currentThread(); SecurityManager security = System.getSecurityManager(); if (g == null ) { if (security != null ) { g = security.getThreadGroup(); } if (g == null ) { g = parent.getThreadGroup(); } } g.checkAccess(); if (security != null ) { if (isCCLOverridden(getClass())) { security.checkPermission(SUBCLASS_IMPLEMENTATION_PERMISSION); } } g.addUnstarted(); this .group = g; this .daemon = parent.isDaemon(); this .priority = parent.getPriority(); if (security == null || isCCLOverridden(parent.getClass())) this .contextClassLoader = parent.getContextClassLoader(); else this .contextClassLoader = parent.contextClassLoader; this .inheritedAccessControlContext = acc != null ? acc : AccessController.getContext(); this .target = target; setPriority(priority); if (inheritThreadLocals && parent.inheritableThreadLocals != null ) this .inheritableThreadLocals = ThreadLocal.createInheritedMap(parent.inheritableThreadLocals); this .stackSize = stackSize; tid = nextThreadID(); } ... }
可以看到左右的构造方法最终都会调用 init();并初始化所属线程组、名字、 Runnable、栈大小等信息;整个过程相当于配置了一个线程工厂,此时只是初始化了所有的配置,线程还没有真正创建,当然资源同样也还没有分配,只有在调用 start() 的时候线程才会真正创建;
此外可以看到线程创建过程中会有很多的权限检查,例如:
1
2
3
4
5
6
SecurityManager security = System.getSecurityManager();if (security != null ) { if (isCCLOverridden(getClass())) { security.checkPermission(SUBCLASS_IMPLEMENTATION_PERMISSION); } }
通常情况下权限的检查默认是没有开启的,所以 security 一直都是 null ;这里需要在启动 JVM 的时候指定 -Djava.security.manager ;当然也可以指定特定的 SecurityManager;但是在开启的时候很可能会遇到类似:java.security.AccessControlException: access denied ;权限检查失败的错误;
此时可以在 jre\lib\security\java.policy 中添加相应的权限;或者直接开启所有权限 permission java.security.AllPermission;
1 2 3 4 5 6 7 8 9 10 11 grant { permission java.lang.RuntimePermission "stopThread" ; permission java.net.SocketPermission "localhost:0" , "listen" ; permission java.util.PropertyPermission "java.version" , "read" ; ... permission java.security.AllPermission; };
3. start 方法
1
2
3
4
5
6
7
8
9
10
11
12
13
14
15
16
17
18
19
public synchronized void start () { if (threadStatus != 0 ) throw new IllegalThreadStateException (); group.add(this ); boolean started = false ; try { start0(); started = true ; } finally { try { if (!started) { group.threadStartFailed(this ); } } catch (Throwable ignore) { } } } private native void start0 () ;
可以看到这是一个同步方法,并且同一个线程不能启动两次;这里首先将线程加入对应的线程组,再真正创建线程,如果创建失败就在线程组中标记;对应的这个 native 方法 start0 ,的源码同样可以查看 openjdk\hotspot\src\share\vm\prims\jvm.cpp,这里就不详细介绍了;
4. exit 方法
1
2
3
4
5
6
7
8
9
10
11
12
13
14
private void exit () { if (group != null ) { group.threadTerminated(this ); group = null ; } target = null ; threadLocals = null ; inheritableThreadLocals = null ; inheritedAccessControlContext = null ; blocker = null ; uncaughtExceptionHandler = null ; }
exit 方法则是由系统调用,在 Thread 销毁前释放资源;
5. 弃用方法
在源码里面还有几个弃用的方法:
1
2
3
public final void stop () { } public final void suspend () { } public final void resume () { }
stop:停止线程会导致它解锁已锁定的所有监视器,从而产生同步问题,因为它本质上是不安全的。
suspend:暂停线程容易出现死锁,如果目标线程在监视器上保持锁定,那么在恢复目标线程之前,任何线程都无法访问此资源。
resume:恢复线程同样容易出现死锁, 如果 A 线程在恢复 B 线程之前锁定监视器,然后在调用 resume 恢复 B,此时 B 会尝试再次获取锁,这样就会导致死锁。
四、线程通讯
其实所有的多线程问题,其本质都是线程之间的通讯问题,也有的说是通讯和同步两个问题(线程间操作的顺序);但我觉得同步仍然是线程之间通过某种方式进行通讯,确定各自执行的相对顺序;所以仍然可以算作是一种通讯问题;这里线程之间的通讯问题可以分成两种:
共享变量,类似锁对象、volatile、中断等操作都可以算是共享变量通讯;
消息传递,类似 wait\notify、管道等则可以算是通过消息直接传递通讯;
下面我们将介绍和 Thread 类直接相关的几种通讯,关于锁的部分之后的博客还会详细介绍;
1. wait\notify 机制
1
2
3
4
5
6
7
8
9
10
11
12
13
14
15
16
17
18
19
20
21
22
23
24
25
26
27
28
29
30
31
32
33
34
35
36
37
38
39
40
41
42
43
44
45
46
47
48
49
50
51
52
@Slf4j public class WaitNotify { private static boolean flag = true ; private static final Object LOCK = new Object (); public static void main (String[] args) throws Exception { Thread waitThread = new Thread (new Wait (), "WaitThread" ); waitThread.start(); TimeUnit.SECONDS.sleep(1 ); Thread notifyThread = new Thread (new Notify (), "NotifyThread" ); notifyThread.start(); } private static class Wait implements Runnable { @Override public void run () { synchronized (LOCK) { while (flag) { try { log.info("flag is true. wait" ); LOCK.wait(); } catch (InterruptedException e) { } } log.info("flag is false. running" ); } } } private static class Notify implements Runnable { @Override public void run () { synchronized (LOCK) { log.info("hold lock. notify" ); LOCK.notify(); flag = false ; SleepUtils.second(5 ); } synchronized (LOCK) { log.info("hold lock again. sleep" ); SleepUtils.second(5 ); } } } }
// 打印:
1
2
3
4
[13 21:18:18,533 INFO ] [WaitThread] WaitNotify - flag is true. wait [13 21:18:19,533 INFO ] [NotifyThread] WaitNotify - hold lock. notify [13 21:18:24,535 INFO ] [NotifyThread] WaitNotify - hold lock again. sleep [13 21:18:29,536 INFO ] [WaitThread] WaitNotify - flag is false. running
2. join
1
2
3
4
5
6
7
8
9
10
11
12
13
14
15
16
17
18
19
20
21
22
23
24
25
26
27
28
29
30
31
@Slf4j public class Join { public static void main (String[] args) throws Exception { Thread previous = Thread.currentThread(); for (int i = 0 ; i < 5 ; i++) { Thread thread = new Thread (new Domino (previous), String.valueOf(i)); thread.start(); previous = thread; } TimeUnit.SECONDS.sleep(5 ); log.info("terminate." ); } private static class Domino implements Runnable { private Thread thread; public Domino (Thread thread) { this .thread = thread; } @Override public void run () { try { thread.join(); } catch (InterruptedException e) { } log.info("terminate." ); } } }
// 打印:
1
2
3
4
5
6
[13 21:27:27,573 INFO ] [main] Join - terminate. [13 21:27:27,574 INFO ] [0] Join - terminate. [13 21:27:27,574 INFO ] [1] Join - terminate. [13 21:27:27,574 INFO ] [2] Join - terminate. [13 21:27:27,574 INFO ] [3] Join - terminate. [13 21:27:27,574 INFO ] [4] Join - terminate.
3. interrupt
以上 wait\notify、join 都比较简单,大家直接看代码应该就能理解;但是 interrupt 机制 则比较复杂一点,我们先从源码分析;
interrupt 方法:
1
2
3
4
5
6
7
8
9
10
11
12
13
14
15
16
17
18
19
20
21
22
23
24
25
private volatile Interruptible blocker;private final Object blockerLock = new Object ();void blockedOn (Interruptible b) { synchronized (blockerLock) { blocker = b; } } public void interrupt () { if (this != Thread.currentThread()) checkAccess(); synchronized (blockerLock) { Interruptible b = blocker; if (b != null ) { interrupt0(); b.interrupt(this ); return ; } } interrupt0(); } private native void interrupt0 () ;
在 Thread 的源码上有详细的注释,以下我简单翻译:
如果线程处于 WAITINF、TIMED_WAITING (正阻塞于 Object 类的 wait()、wait(long)、wait(long, int)方法,或者 Thread 类的 join()、join(long)、join(long, int)、sleep(long)、sleep(long, int)方法),则该线程的中断状态将被清除,并收到一个 java.lang.InterruptedException;
如果线程正阻塞于 InterruptibleChannel 上的 I/O 操作,则该通道将被关闭,同时该线程的中断状态被设置,并收到一个java.nio.channels.ClosedByInterruptException;
如果线程正阻塞于 java.nio.channels.Selector 操作,则该线程的中断状态被设置,同时它将立即从选择操作返回,并可能带有一个非零值,其效果同 java.nio.channels.Selector.wakeup() 方法一样;
如果上述条件都不成立,则该线程的中断状态将被设置;
其中 Interruptible blocker 就是在 NIO 操作的时候通过 sun.misc.SharedSecrets 设置的(其效果同反射,但是不会生成其他对象,也就是不会触发 OOM);
interrupted 、isInterrupted 方法:
1
2
3
4
5
6
7
8
9
public static boolean interrupted () { return currentThread().isInterrupted(true ); } public boolean isInterrupted () { return isInterrupted(false ); } private native boolean isInterrupted (boolean ClearInterrupted) ;
可以很清楚的看到他们都是通过 isInterrupted(boolean ClearInterrupted) 方法实现的,但是 interrupted 会清除中断状态,而 isInterrupted 则不会清除;
以上 interrupt 机制 就通过设置 interrupt flag,查询中断状态,以及中断异常构成了一套完整的通讯机制;也可以看作是通过 interrupt flag 共享变量实现的,下面我们简单举例:
1
2
3
4
5
6
7
8
9
10
11
12
13
14
15
16
17
18
19
20
21
22
23
24
25
26
27
28
29
30
31
32
33
34
35
36
37
38
39
40
41
42
43
44
45
46
47
48
49
50
51
52
53
@Slf4j public class Interrupted { public static void main (String[] args) throws Exception { Thread sleepThread = new Thread (new SleepRunner (), "SleepThread" ); sleepThread.setDaemon(true ); Thread busyThread = new Thread (new BusyRunner (), "BusyThread" ); busyThread.setDaemon(true ); sleepThread.start(); busyThread.start(); TimeUnit.SECONDS.sleep(5 ); sleepThread.interrupt(); busyThread.interrupt(); log.info("SleepThread interrupted is {}" , sleepThread.isInterrupted()); log.info("BusyThread interrupted is {}" , busyThread.isInterrupted()); TimeUnit.SECONDS.sleep(5 ); log.info("exit" ); } static class SleepRunner implements Runnable { @Override public void run () { try { while (true ) { Thread.sleep(2000 ); } } catch (InterruptedException e) { log.error("SleepThread interrupted is {}" , Thread.currentThread().isInterrupted()); Thread.currentThread().interrupt(); log.error("SleepThread interrupted is {}" , Thread.currentThread().isInterrupted()); } log.info("exit" ); } } static class BusyRunner implements Runnable { @Override public void run () { if (1 == 1 ) { while (true ) { } } log.info("exit" ); } } }
// 打印:
1
2
3
4
5
6
[14 10:20:55,269 INFO ] [main] Interrupted - SleepThread interrupted is false [14 10:20:55,269 ERROR] [SleepThread] Interrupted - SleepThread interrupted is false [14 10:20:55,270 INFO ] [main] Interrupted - BusyThread interrupted is true [14 10:20:55,270 ERROR] [SleepThread] Interrupted - SleepThread interrupted is true [14 10:20:55,271 INFO ] [SleepThread] Interrupted - exit [14 10:21:00,271 INFO ] [main] Interrupted - exit
从日志中可以看到:
打断的确是一个标记,对于未处于可打断状态的线程,或者没有处理打断状态的线程是没有影响的,就像 BusyThread;
使用 interrupt 打断睡眠线程,也的确符合上面的情况,但是因为收到 InterruptedException 的时候会清楚中断标记,所以这里可以再次设置中断标记;
当然以上只是简单的举例,中断机制如何使用还是要根据具体的业务逻辑来确定;另外以上的实例代码是出自《Java 并发编程的艺术》,有兴趣的也可以找书来看一下;
总结
以上的内容其主要目的是为了帮助你构建一个相对完善的线程知识体系,其中还有很多的细节没有讲到,具体内容还需要结合实际场景分析;